
Hostwinds Tutorials
Search results for:
Table of Contents
How To Run Python Web frameworks (Ubuntu 18.04)
Tags: Ubuntu
Python is a popular language for some web developers. It has frameworks such as Flask and Django that can speed up backend web development. This guide will go over how to get the Django framework up and running on a Hostwinds VPS server to be served over the internet.
You will need the following to get started:
- Hostwinds Linux Cloud VPS Server
- SSH access
- Ubuntu 18.04
- A domain name that is pointed to your server
We will be using:
- NGINX Web Server
- Django Python framework
- uWSGI acting as an interface between the two.
Creating a user
Most services on your system do not need to run as root, and for security reasons, we will set up a non-root user to run the rest of the commands in this guide. You may call this user anything. Here, I'm creating a user called "user":
adduser user
It should then prompt you for a password for this new user, create a password you can remember, and make it hard for others to guess. It'll also ask for some additional information, but it should not affect anything if you leave all those fields blank. Now, we do want this user to run some root commands, so for my "user", I'm going to add them to a group called "sudo".
usermod -aG sudo user
This will enable users to prefix their commands with "sudo" to run commands normally protected by root using the user's password.
Now, use the 'exit' command, and log back into the server using SSH as the user you set up. For the user we just set up, the username will be "user", and the password will be the one you've set when you ran the adduser command.
Installing and setting up Django
To use Django, you'll need to set up a Python environment. Start by using these commands to update your software to the latest version:
sudo apt update && sudo apt upgrade
Now, we will need some system-wide software. Thankfully, everything that we need is available from the Ubuntu repositories and can be installed with apt-get.
sudo apt-get install python3-pip nginx
With the system-wide software installed, we can build out our private Django environment. Run:
mkdir public_html
cd public_html
python3 -m venv django_serve
This will create a folder called django_serve with a few things in it. It has its own version of python, and when we activate the source file, software installed with pip will go in that directory instead of system-wide. The next step is to activate the private python file and install Django.
source django-serve/bin/activate
Now, we can install Django and start a Django project using the commands:
pip install django
django-admin startproject my_site
To allow our web server to access Django, we need to add the domain to the allowed hosts. You can write or edit a file on the command line using a command-line text editor. Many are available on Linux, and we will be using nano in this guide.
Using nano, edit the file settings.py in the mysite directory like so:
nano mysite/settings.py
Once in the file, find the line that reads: ALLOWED_HOSTS = [].
In the brackets, add your site's domain name with quotation marks like so:
ALLOWED_HOSTS = ['yourdomain.com', 'www.yourdomain.com']
Pressing Control-X exits nano when it asks you to save, press 'y'.
You can use the deactivate command to go back into the regular shell.
With a new site created, we can turn our attention to setting up uWSGI.
uWSGI Configuration
uWSGI is a protocol software that communicates between the python code and the webserver software. For simplicity, we are going to have our host use only one uWSGI instance. We will set up a configuration file for our project and create a systemd service to run it in the background.
To get started, we need to write a file to configure uWSGI.
Once more, we will use nano to write a file:
nano mysite.ini
Here is a barebones INI file to get us started:
#/home/user/public_html/mysite.ini
[uwsgi]
socket = 127.0.0.1:10080
chdir = /home/$USER/public_html/my_site
module = my_site.wsgi:application
processes = 4
threads = 2
Replace $USER above with the username you are using and my_site with your domain name.
Systemd Service configuration
Once the uWSGI is set up, we need to get Linux to run it automatically in the background. Most modern Linux distributions managed this with the systemd software. You will need to create what is called a "Service File" for systemd to be able to manage uWSGI.
We'll call our file my_site.service. To open it and set up the service, run:
sudo nano /etc/system/systemd/my_site.service
#/etc/system/systemd/my_site.service
#Tells Systemd about your site
[Unit]
Description=Guide test site.
After=network.target

#Where systemd should start it from.
[Service]
User=$USER
Group=www-data
WorkingDirectory=/home/user/public_html/my_site
Environment="PATH=/home/user/django_serve/bin"
ExecStart=/home/user/public_html/django_serve/bin/uwsgi my_site.ini

#For starting the service at boot.
[Install]
WantedBy=multi-user.target
Replace $USER above with the username you are working with and my_site with your domain name.
NGINX Configuration
Finally, we need to set up NGINX to listen to uWSGI and pass requests to it from the web. This configuration is actually quite simple to set up. Start with editing a new file and again replacing my_site below with your domain name:
sudo nano /etc/nginx/sites-available/my_site.conf
# /etc/nginx/sites-available

# tell it where to look for django
upstream django_serve {
    server 127.0.0.1:10800;
}

server {
    listen 80; #can be 443 if you have SSL set up.
    root /home/user/public_html/my_site/;
    server_name www.my_site.com;

    location / {
        uwsgi_pass django_serve;
        include uswgi_params;
    }
}
For NGINX to read and use this file, we need to add it to the sites-enabled directory. This command creates a soft link to it.
sudo ln -s /etc/nginx/sites-available/my_site.conf /etc/nginx/site-enabled
Now, reload NGINX:
sudo systemctl restart nginx
Now, try visiting the site on your VPS. If it all went well, you should see this:
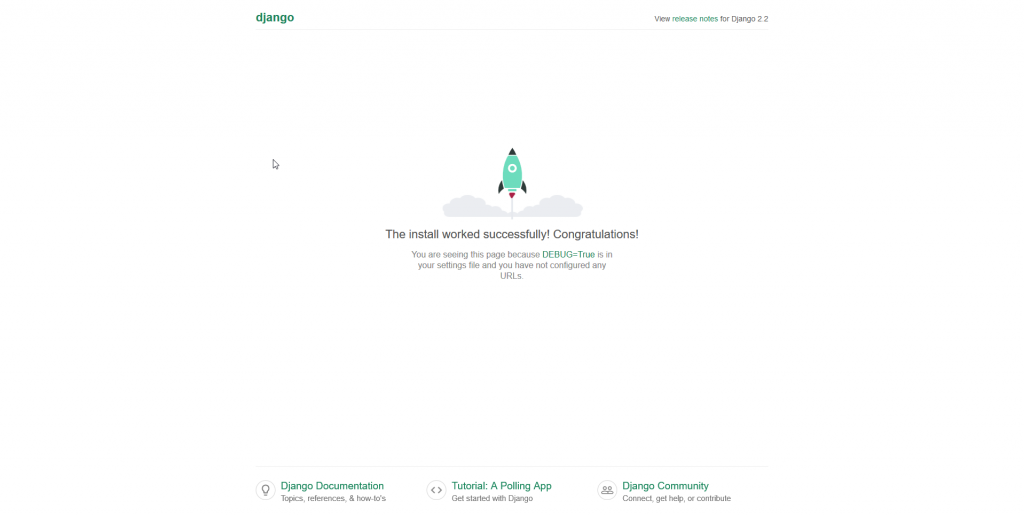
Django's default web page.
Conclusion
While there are many ways of setting up uWSGI and NGINX, this one is very simple and straightforward. Hopefully, this guide is enough to get you started, and as always, you can reach out to us if you have any additional questions or concerns.
Written by Hostwinds Team / July 26, 2019