
Hostwinds Tutorials
Search results for:
Table of Contents
Windows Subsystem for Linux: How to Install & Configure WSL
Tags: Cloud Servers, Dedicated Server
What is WSL?
Windows Subsystem for Linux (WSL) is a feature introduced by Microsoft, aimed at giving users the ability to run Linux distributions directly on the Windows operating system. It serves as a compatibility layer, allowing the execution of native Linux binaries within the Windows environment.
At its core, WSL operates by creating a translation layer that allows Linux and Windows to communicate with one another. This allows Linux command-line tools and utilities to function on a Windows operating system, bridging the gap between the two distinct operating systems.
What's Covered in this Tutorial
In this tutorial, we'll go over the following:
- Installation of WSL on Windows systems.
- Setting up your WSL environment
- Troubleshooting errors.
- Benefits of integrating WSL into your workflow.
Once you've finished with this tutorial, you'll be able to run a Linux distribution on your Windows machine. To get the most out of this feature check out our tutorial on how to use Windows Subsystem for Linux where you'll learn how to utilize the file system and mix Linux and Windows commands.
Updating Windows
To ensure you have all of the required WSL components, make sure Windows is updated. A relatively universal way to do so is as follows:
Step 1: Open Run Box
- Press Windows key + R.
Step 2: Open Windows Update
- Type "control update", then hit ENTER or select the OK button.
Step 3: Update and Restart
- Select the Check for updates button.
- If an update is required, you'll need to restart your computer.
How to Install and Set up Linux on Windows with WSL
Now that we have updated Windows, let's walk through the steps for installing WSL on your computer and go over a few setup considerations thereafter.
Installing WSL on your Computer
Step 1: Open PowerShell
Access Powershell through the command-line interface by right-clicking on the Start button, select "Windows PowerShell (Admin)" from the menu.
Step 2: Enable WSL Feature
In the PowerShell window, type the following command and press ENTER:
dism.exe /online /enable-feature /featurename:Microsoft-Windows-Subsystem-Linux /all /norestart Step 3: Restart Your Computer
Save your work and restart your computer. This step is necessary to complete the enabling process.
Step 4: Install Your Linux Distribution
After restarting, open PowerShell as Administrator again, and run the following command to install the default Linux distribution Ubuntu:
wsl --install(Optional) Installing Alterative Distributions
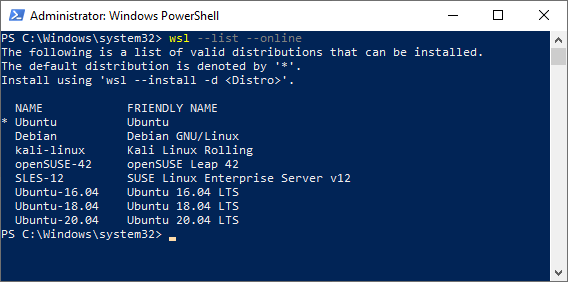
- You have the option to download other Linux distributions (distros) from the online store. To view a list of those distros use the following command:
wsl --list --online- To install a distribution from the store, use the following command:
wsl --install --distribution <Distro Name>- Replace <Distro Name> with the name of the distribution as it's written in the prompt window
Step 5: Restart Your Computer
- Since you're at the PowerShell command prompt, this can be done as follows:
Restart-ComputerNote: If you receive the following error, Go to the section titled "Error 0x80370102" below. Otherwise, proceed to the next step.

Step 6: Launch Your Linux Distribution
- Once the Linux distro is installed, you can launch it by selecting the Start menu, then the Linux distribution you installed. For example:

Step 7: Setup User Account
- Enter a Linux username and password (admin is not an option, as shown):
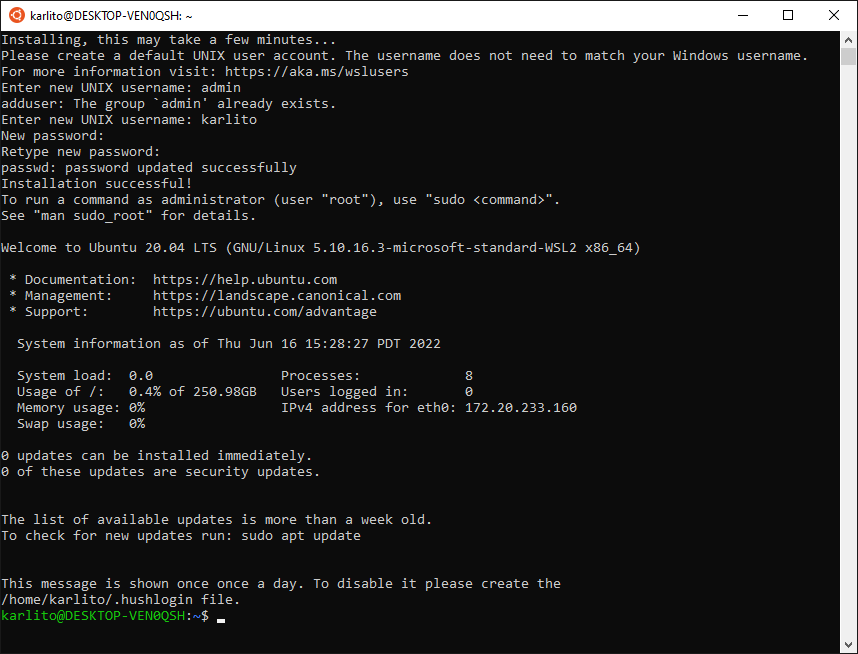
That's it! You've successfully installed Windows Subsystem for Linux (WSL) on your Windows machine. You can now use Linux command-line tools and utilities directly within the Windows environment.
Setting Up Your WSL Environment
Once your Linux distro is install, you can you can start customizing it. Here are a few options to consider:
Set Default WSL Version: If you installed both WSL 1 and WSL 2, you can set the default version to be used by running the following command in PowerShell:
wsl --set-default-version 2Note: Replace 2 with 1 if you prefer to use WSL 1.
Customize Terminal Emulator: Consider installing and customizing a terminal emulator such as Windows Terminal or ConEmu to enhance your command-line experience. These tools offer features like tabs, customizable themes, and better integration with WSL.
Configure Shell: You can customize your shell environment by editing configuration files such as .bashrc or .zshrc in your Linux home directory. These files allow you to set environment variables, define aliases, and customize your shell prompt.
Install Additional Tools and Packages: Use the package manager (apt for Debian-based distributions like Ubuntu, dnf for Fedora, etc.) to install additional tools and packages that you need for your development or system administration tasks.
Integrate with IDEs and Editors: Many popular integrated development environments (IDEs) and text editors offer support for WSL. You can configure them to use WSL as the default terminal or to access files directly from your WSL filesystem.
Enable File Sharing: If you want to access files stored on your Windows filesystem from within WSL, you can enable file sharing by creating symbolic links or using the \\wsl$ <distro name> path.
Explore WSL Configuration File: Take some time to explore and configure WSL settings using the wsl.conf configuration file. This file allows you to customize various aspects of WSL, such as filesystem performance and network settings.
Update and Upgrade Packages: After setting up WSL, you can update and upgrade the packages in your Linux distribution by running the following commands in the Linux terminal:
sudo apt update
sudo apt upgrade
Updating WSL
You always want to be sure you're running the latest version of WSL. To do this, return to Powershell and run the following command:
wsl --update- If a WSL update is available, you will see:
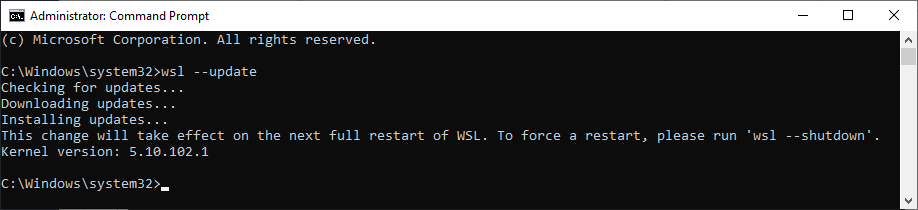
- As suggested above, run the following command (from an elevated PowerShell or Windows command prompt):
wsl --shutdownHow to fix Error 0x80370102
WSL requires Hyper-V and virtualization to be enabled on your computer. If you received the 0x80370102 error during installation, it is likely due to the absence of those features.
Follow these steps to make sure Hyper-V and virtualization are active.
Enable Hardware Virtualization
Step 1: Open Task Manager
- Press press Ctrl + Shift + Esc to open Task Manager.
Step 2: View Virtualization
Select the Performance tab, then CPU, and note if virtualization is disabled:
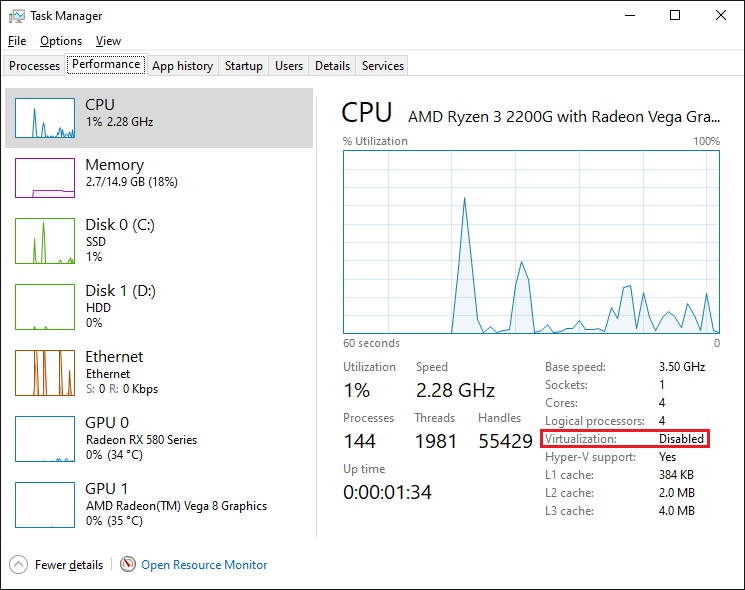
- If virtualization is enabled, then move down to the Hyper-V section below
Step 3: Open BIOS/UEFI Settings
- To access BIOS/UEFI settings you need to restart the computer, and while it's booting up press and hold the F2 key or whichever key is appropriate for your system (How to enable or disable Hardware Virtualization in Windows 11/10 may be helpful in this regard).
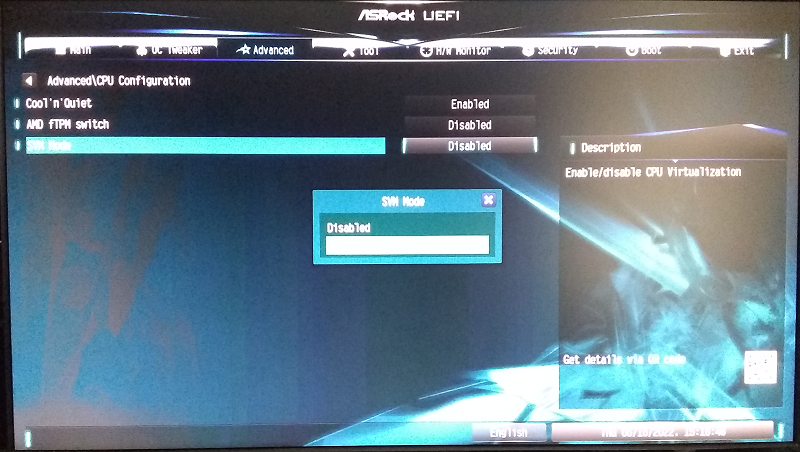
- Once BIOS/UEFI window opens, find the setting that enables hardware virtualization and select it - the following example should give you a sense of this process:
Example:
- Select Advanced > CPU Configuration > SVM Mode (i.e., Secure Virtual Machine), and then Enabled.
- Select Exit > Save Changes and Exit > Yes
Step 4: Verify Virtualization
- Open Task Manager (Ctrl + Shift + Esc) and verify that virtualization has been enabled:

Enable Hyper-V
Step 1: Open Windows Features
- Press Windows key + R, type "optional features", and select the OK button.
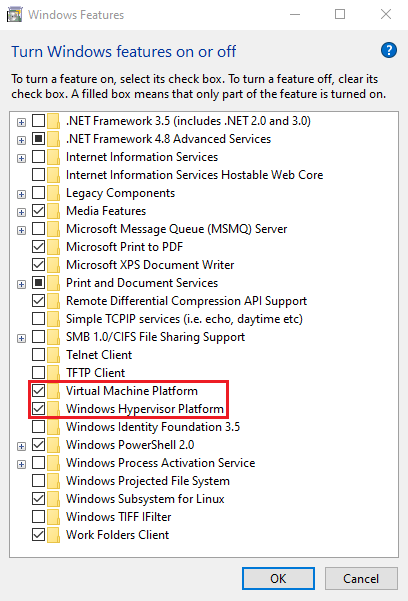
Step 2: Enable Hyper-V
- Ensure that Virtual Machine Platform and Windows Hypervisor Platform are both checked
- Select OK
Step 3: Restart Computer
- Restart the computer (shutdown /r /t 0 at a Windows command prompt will do this).
Step 4: Open Linux Distro
- Select the Start menu, then the Linux distribution you installed. If you do not receive an error, you're good to go.
If you're still running into issues with the Hypervisor, run the following command from the Powershell:
bcdedit /set hypervisorlaunchtype autoYou should see:
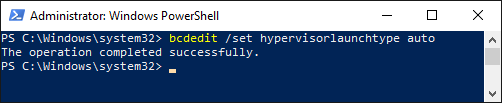
Restart the computer and open the Linux distro once more and you should be good to go!
Benefits of WSL
WSL bridges the gap between Windows and Linux environments, removing OS barriers and offering you more options for an improved workflow
Here are a few key reasons why it might be worth considering adding WSL to your virtual toolbox:
Enhanced Development Experience: Developers can leverage WSL to access Linux development tools, libraries, and frameworks directly on their Windows machines, streamlining the development process and eliminating the need for separate Linux-based environments.
Cross-Platform Compatibility: WSL promotes interoperability by enabling users to work with both Windows and Linux applications side by side, fostering a cohesive computing experience regardless of the underlying operating system.
Expanded Utility for System Administrators: System administrators benefit from WSL's ability to execute Linux administrative tasks and scripts on Windows servers, simplifying management and maintenance operations in heterogeneous IT environments.
Seamless Integration: WSL seamlessly integrates Linux capabilities into the Windows ecosystem, allowing users to harness the strengths of both platforms without the overhead of traditional virtualization solutions.
Written by Karlito Bonnevie / June 16, 2022