
Hostwinds Tutorials
Search results for:
Table of Contents
How to Add Domains in Centos 7
Tags: CentOS Web Panel
When working with CentOS 7 Web Panel (CWP7), you may need to add a domain to an existing user. This is common when you want to have multiple variations of a domain point to the same content or have more than one site among domains that you wish to host inside the same user account. This guide will go over how to add domains within CentOS Web Panel.
You will need to create a user if you have not already created one. Follow the instructions to create a user account in CentOS Web Panel before following this guide.
Adding the Domain
Step 1: If you are not already logged in, log in to your CWP7 dashboard. By default, this is done by navigating to the IP Address of your server and affixing the port number of "2030" at the end. It looks something like this:
192.168.1.183:2030
Once logged in, you should see your CWP7 Dashboard.


Step 2: click on the dropdown on the left, then click to be taken to the Add Domain page.
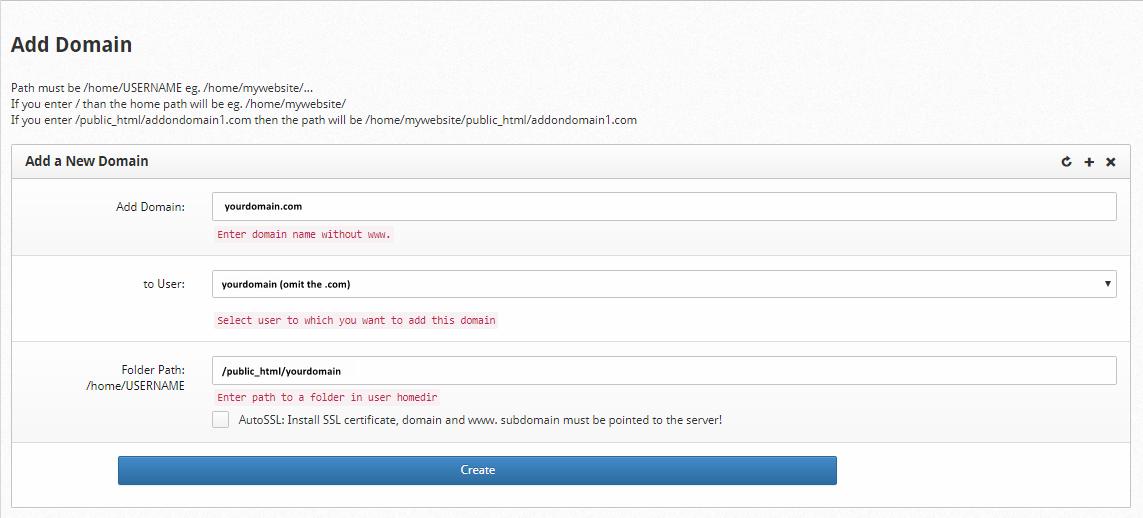
Step 3: Insert the domain you wish to add in the Add Domain text box. Do not include "www." This is technically a subdomain, and CentOS Web Panel will add this for you.

Step 4: Select the user you wish to assign the domain to from the to User dropdown. You may not need to do anything here if you have only set up one user.
Step 5: Enter the location in your hosting directory that you want this domain to use as its root directory. The default is to have your website stored in a subfolder of your primary /public_html/ folder. To change this behavior, you can enter a different folder where it currently shows /public_html/. This is also where you can enable AutoSSL if you wish to use your current method of AutoSSL (Let's Encrypt is the default for CentOS Web Panel). This must be configured beforehand.

Step 6: Click Create, and your added domain will run through the "create" process. You will see Success! Alert near the top of the page after the process is complete.
Note: It's normal to see an error message stating "AutoSSL Issue Failed!" listed above the success box. This is because AutoSSL cannot succeed on a domain that has just been added. AutoSSL Will continue to run its scheduled tasks and apply a valid certificate to the new domain, assuming it is configured correctly. Please allow up to 24 hours for this to take place.
You have successfully added a domain to an existing user account. You are now free to log in to the user account and configure the domain as you intend.
Written by Hostwinds Team / December 6, 2018