
Hostwinds Tutorials
Search results for:
Table of Contents
How to Set Up Email in CentOS Web Panel
Tags: CentOS Web Panel
When using CentOS Web Panel, you will need to manage emails when administering the server. This guide will go over admin email creation within CentOS Web Panel and is intended for Hostwinds clients with a Dedicated Server or Cloud VPS Server.
Creating an Email
Step 1: If you are not already logged in, log in to your CWP7 dashboard. By default, this is done by navigating to the IP Address of your server and affixing the port number of "2030" at the end. It looks something like this:
192.168.1.183:2030
Once logged in, you should see your CWP7 Dashboard.


Step 2: Click on the drop-down on the left, then click to be taken to the Add Email Account page.
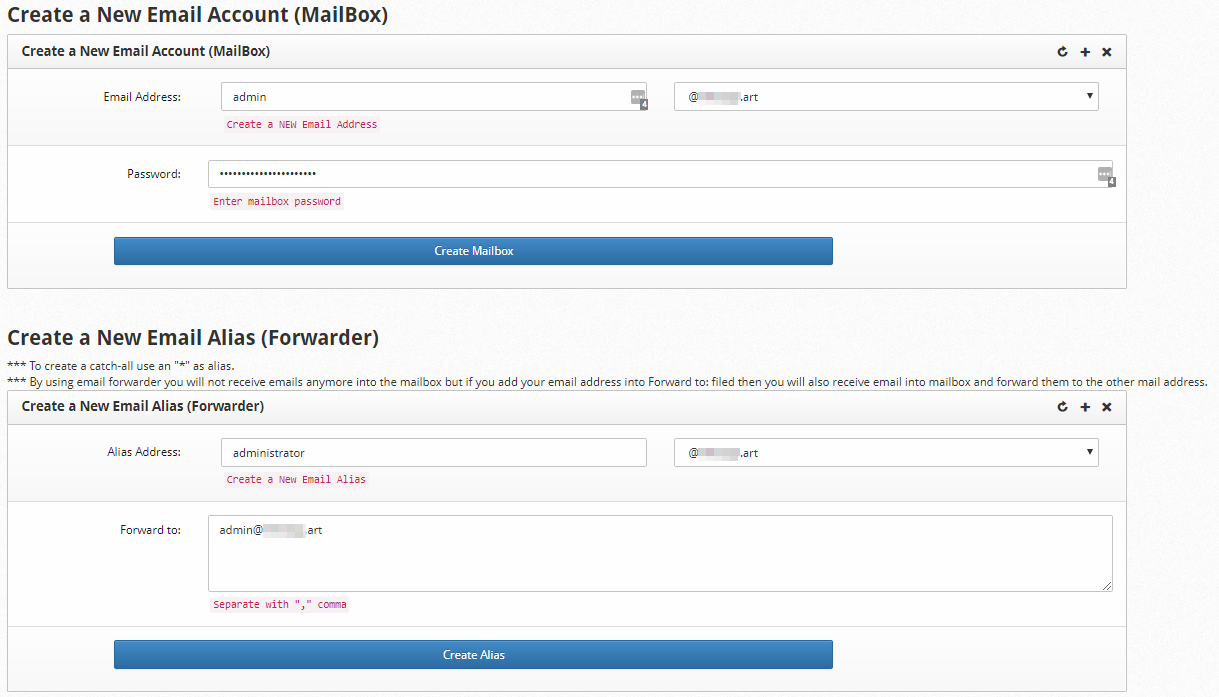
Step 3: Enter the email address beginning you wish to create in the Email Address box. Do not put an @ symbol, as you will select that in the next section.

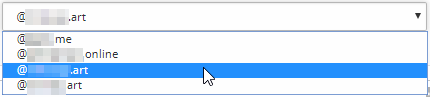
Step 4: Select the domain you want to create the email account for in the dropdown box.
Step 5: Enter a password for the account that is to be created.

Step 6: Click Create Mailbox to finish creating the email address.

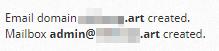
You have now created an email address using CentOS Web Panel. You should see a message above the create email form stating the success of the mailbox creation. If it is the first email address you've set up on this domain, you'll also see an email domain yourdomain.com created message.
Creating an Email Alias
An alias is convenient if you want a separate email address that goes to an existing inbox. An example of this would be having the alias admin@example.com being delivered to the existing administrator@example.com email address. This saves you storage space and still allows you to have multiple emails set up.
You can also use an alias email address to catch all emails sent to your server at addresses that do not exist. Simply creating an alias of *@example.com and direct it to an existing email address would act as a wildcard catchall. Setting one up is as simple as creating an email address.
Step 1: On the same page, create the email address in the steps above, create a new email alias section, and enter the first part of the address you want to set up as an alias in the alias address box. As before, do not put an @ sign here.

Step 2: Select the domain you wish to create the alias email from the domain selection drop-down box.
Step 3: Enter as many email addresses as you wish in the forward-to-box. Separate each additional email with a comma.

Step 4: ** Click the **create alias button.

You have no created an alias address. Similarly to when you created an email address, you should receive a Success message near the top of the forms.

Written by Hostwinds Team / December 7, 2018