
Hostwinds Tutorials
Search results for:
Table of Contents
File Manager for CentOS 7 Web Panel
Tags: CentOS Web Panel
When using the CentOS 7 Web Panel (CWP7) on your Hostwinds VPS or dedicated server, the occasional requirement of modifying, creating, editing, or removing files on your server surfaces. The easiest, most direct way to do so is by utilizing the built-in File Manager for CWP7. This article will detail how to launch it, use it, and what common processes may call for its use.
File Manager for CentOS 7 Web Panel
Getting to the File Manager
Step 1: If you are not already logged in, log in to your CWP7 dashboard. By default, this is done by navigating to the IP Address of your server and affixing the port number of "2030" at the end. It looks something like this:
YourServerIPAddress:2030
Once logged in, you should see your CWP7 Dashboard.
Step 2: Click the button in the Quick Access section that says "File Manager." Make sure your browser allows for new windows to be created, as the file manager will be launched in a new tab, or window, depending on how your browser handles new page creation.

Step 3: By default, the new tab or window created should gain focus automatically. If it does not, simply click over to the tab or window that was created. You should see the following, or something similar:
From here, you are presented with the default layout and default directory that loads when. We will go over each section below.
Parts of the File Manager
File Tree


This section of the file manager will list the current "structure" of the file system and show open folders as you navigate from folder to folder. At any time, you can click a visible folder to be taken to that folder immediately. Clicking any of the tiny triangles to the left of the folder will open up the subfolders available to that folder if any exist. This section is a great tool for making sure you're in the correct subdirectory or jumping between two folders quickly. Keep in mind. Files will not show up in this view, only folders.
Command Panel

This section has a lot of functionality. There are a few pieces here you probably won't need, but it is certainly important to know what they do. We will go over each piece in the table below.
Button Description Details

File Manager Configuration This button opens up an overlay menu that allows you to modify various settings and receive various pieces of information about the file manager. You will likely not use this button often.

Server PHP Information This button creates an overlay window that shows a full-detail breakdown of all PHP settings, modules, and versions. This can be very handy if you're ever trying to troubleshoot problems with PHP on your server. You will potentially need this button.

Create a new folder This button creates an overlay window that allows you to create a new subdirectory (folder) in the current folder. This is handy if ever you need to create a folder manually for any number of different reasons. You will likely use this button.

Create a new file This button creates an overlay window that allows you to create a new file in your current folder. This is handy if ever you need to create a file manually for any number of different reasons. The most common reason for something like this would be to create a .htaccess file manually. You will potentially use this button.

Upload to the server This button creates an overlay window that allows you to upload files to the folder you are in. This is handy if you would like to manually transfer one or two files at a time to the server outside of your normal publishing method. Typically, you would use an FTP client to do this. You will likely use this button.

Create a shell prompt This button creates an overlay window with a localized bash (command) prompt. It will always make the "Document Root" of the session your current folder and will not allow this window to a folder higher in the folder structure than it currently is. Typically, this type of session would be done from an SSH Client. You will likely never use this button.

Initiate a scan of ports. This button creates an overlay window with a tool that allows you to scan ports that may be open on your server. This button should be used sparingly if at all, as excessive use could be seen as a malicious attack on your server. You will likely never use this button.

|

Select All or Select None These buttons are used to select (highlight) all available options or remove any existing selections. The select all function is useful for needing to move/copy/delete the entirety of a subfolder and its contents. The select none button is useful for deselecting any currently active selections in a single click. You will likely use this pair of buttons.

Inverse the current selection This button is used to select any unselected items while deselecting any selected items in one action. There are a small number of reasons why this may be useful. You will not likely use this button.

Delete the current selection This button is used to delete the currently selected files or folders. It is not instant, as it will prompt the user to confirm the deletion. You will probably use this button.

Copy the current selection This button creates a copy of the selected files in a different subdirectory. Using this function is not as straightforward as one would hope, so here is how you do it: First, select the files you want to copy. Next, click the
Button. Red text will show up asking you to click on a directory in the file tree to the left. Finally, click on the target directory you want them copied to, and a dialogue will pop up asking to confirm. You will probably use this button.

Move the current selection This button moves the selected files to a different directory. This button is identical in function to the Copy button above but will delete the files in the source folder. Using the button is identical to using the Copy button above. You will likely use this button.

Compress the current selection This button creates a compressed file with your choice of extension (.zip, .tar, .gzip) containing the current selection of files and folders. This is useful if ever you need to create a backup of your current file structure or a specific folder and its contents. To use it, select the files you wish to compress, click.
And enter the name and extension and click ok/confirm/submit. Unless you specifically know why you would need other extensions, you should use the .zip extension. You will potentially use this button.

Changes how details display This button changes how the "Permissions," "Owner," and "Group" columns display their content. This changes the displayed information between numeric, "code-friendly" text and "user-friendly" readable text. The information displayed here is largely only used during advanced troubleshooting and rarely, if ever, actually needs to be known or changed. You will likely never use this button.

Modify the permissions of the current selection This button opens an overlay window that can modify the permissions of the current selection. As with the above Resolve IDs button, this button is almost exclusively used for troubleshooting purposes. You will likely never use this button.


You will also be able to see the current folder absolute path here as well. It looks like this. This is good information to locate, as it becomes important to understand the structure of your files and where they are saved within your server's file system. You can click the to move to the folder directly above the current folder in the folder structure.
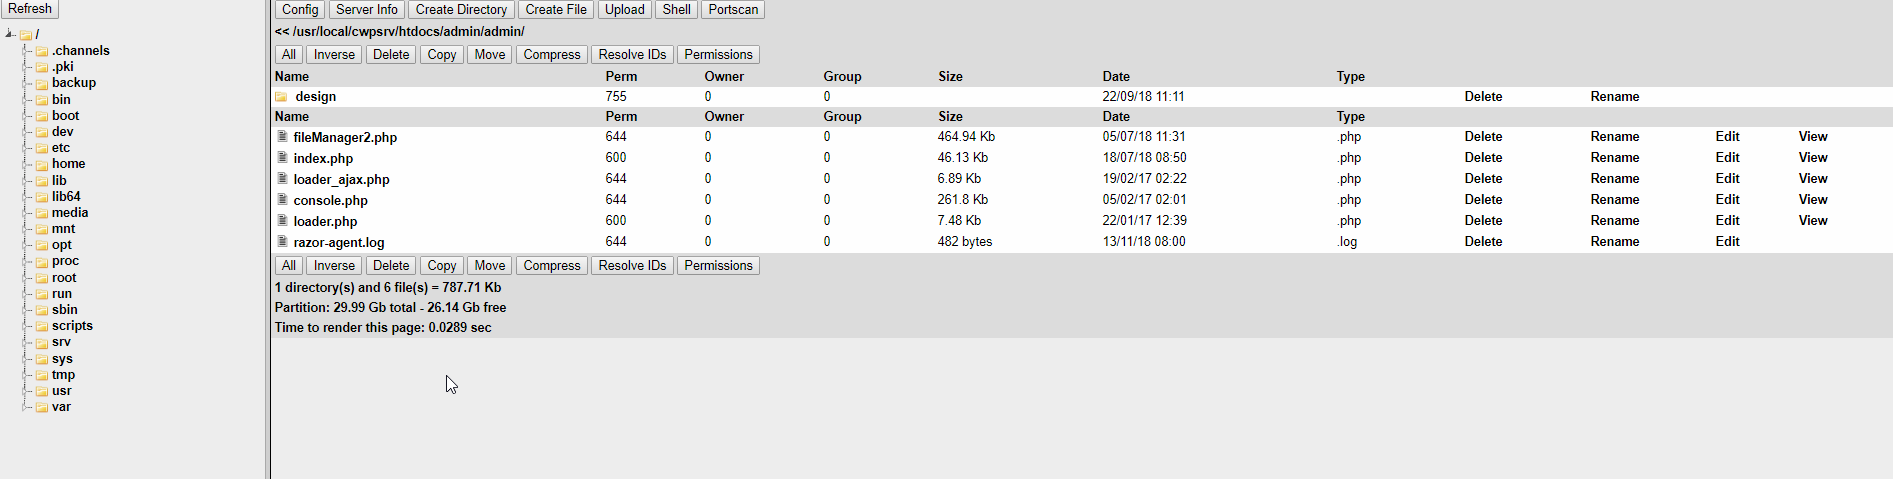
Selected Directory Listing

This section of the page is the main focus of the file manager tool. This is where you actually view, select, manage, and otherwise handle the files being managed. Directories (folders) are listed first. Then individual files are listed below. You can also see their current permissions, what user is the current owner, what group the user belongs to, the size of files, the date of creation, and the file type. There are also options to manipulate individual files and folders listed to the right of each row. At the very bottom, below the mirror of buttons detailed earlier in this article, are further details about the contents of the folder and how much total space versus available space is in use.
Written by Hostwinds Team / November 20, 2018