
Hostwinds Tutorials
Search results for:
Table of Contents
How to Mount Object Storage to a VPS (Ubuntu 18.04)
S3 File System (s3fs) is a utility that allows remote object storage containers, or buckets, to be exported as a local file system. This means that Hostwinds' Object Storage can be mounted to a VPS, and the user can have access to scalable, and static storage locally. Object storage can be used for storing backups, file-sharing, or other unstructured data. The guide below will explain the steps required to mount Hostwinds' Object Storage to a Ubuntu 18.04 server.
Step 1: Install s3fs-fuse:
Access your VPS via SSH as the root user or a user with sudo access. Next, install s3fs-fuse with the following:
sudo apt-get install build-essential git libfuse-dev libcurl4-openssl-dev libxml2-dev mime-support automake libtool

sudo apt-get install pkg-config libssl-dev

git clone https://github.com/s3fs-fuse/s3fs-fuse

cd s3fs-fuse/

./autogen.sh

./configure --prefix=/usr --with-openssl

make

sudo make install
Step 2: Retrieve the Hostwinds Object API Info:
After completing the installation, you can retrieve your Object Storage API information from Hostwinds' Cloud Control portal. Navigate from the client area to the Cloud Portal.
Next, select Storage > Object Storage, as seen below.
Select Create Container. Name the container and select your preference of Hostwinds data center locations.
Next, select Object API Info. You will need your Access Key, Secret Key, and API Endpoint for the selected location. Store this information temporarily for the following steps, or leave this page open while proceeding.
Step 3: Create Credentials File:
Using a text editor, create your credentials file:
vi /etc/passwd-s3fs
Then enter your Hostwinds API credentials in the first line of the new file, in the format:
ACCESS_KEY: SECRET_KEY
Next, change the permissions of this file:
chmod 600 /etc/passwd-s3fs
Step 4: Create Mountpoint and Cache:
Now you can create your mount point and the cache for the container. Use a mount point similar to below. It does not need to be called my-container:
mkdir /tmp/cache /mnt/my-container
Change the permissions:
chmod 777 /tmp/cache /mnt/my-container
Step 5: Make New Entry in fstab:
Finally, you will need to add a line to /etc/fstab:
vi /etc/fstab
fstab has 6 columns. Be careful to add the following to your new line, separated by spaces:
- s3fs#\
- \
- fuse
- url=\,passwd_file=etc/passwd-s3fs,use_cache=/tmp/cache,nonempty,allow_other,use_path_request_style,_netdev
- 0
- 0
You will need your own \, \, and \
Lastly, mount the container using:
mount -a
Reboot, and verify that the container stays mounted on boot by running:
df -h
The output should be similar to:
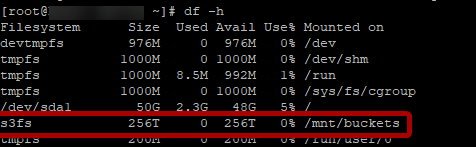
Now you have access to far more storage at $0.03/GB/month!
Notes:
To mount additional containers from the same data center location:
- Then, perform Steps 4 and 5 again using a different container name and mount point.
To mount additional containers from a different data center location:
- Then, perform Steps 2-5 again using a new Access Key, Secret Key, API Endpoint, container name, mount point, and credentials file.
Written by Hostwinds Team / June 5, 2021