
Hostwinds Tutorials
Search results for:
Table of Contents
Listing Accounts in WHM
Tags: WHM
Within WHM, aside from making global server-wide changes, you can also view a list of the cPanel accounts that have been created on the server. This is useful for getting a brief overview of disk usage per cPanel account and accessing the accounts without needing the password.
This guide is intended to help Hostwinds Cloud VPS and/or Dedicated Server clients with valid cPanel licenses.
Where To List Accounts
Step One: Log into your WHM Administrator dashboard.
Step Two: In the upper left corner of WHM, there will be a search box. Search for 'Account Information.
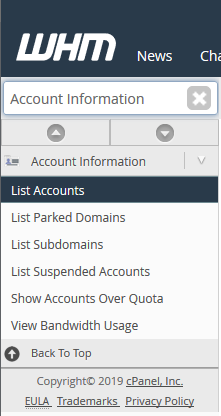
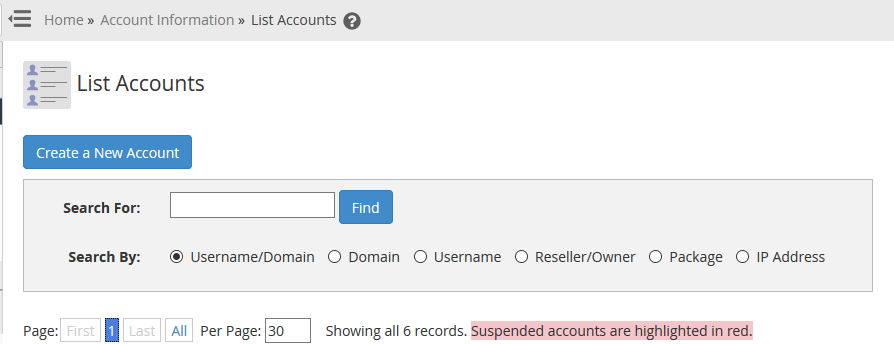
Step Three: From the available options shown, click on List Accounts. This will bring you to a page where you will see all the cPanel accounts that currently exist on the server and some short details about each account.
In addition to listing details regarding the cPanel accounts, you also have a quick link to Create a New Account.

Searching Through cPanel Accounts
From the List Accounts page in WHM, if you have many accounts on the server, it may be easier to search based on a setting on the cPanel account. Luckily at the top, there is a Search box that can be used to sort the cPanel accounts easily.

You have the option to search based on the Username and Domain of the account, just the Domain, just the Username, based on the Reseller or owner of the account, the package name, and IP address that is set for the cPanel account.
After searching, the accounts that match the search terms will be shown, with all other accounts temporarily hidden.
Viewing Account Summaries
When viewing cPanel accounts in the List Accounts page of WHM, some details are made readily available. These can be used to get quick information or help identify a particular account.

- Domain – This lists the primary domain of the cPanel account.
- cPanel – This link can be used to directly log into the cPanel account without requiring the cPanel account's password.
- IP Address – The IP address that is being used by the cPanel account and domains that are hosted in that account.
- Username – The cPanel Username that is used to login into the cPanel account.
- Contact Email – This is where notifications and emails for this cPanel account are sent.
- Setup Date – This will be a timestamp of the date the account had been created or set up.
- Partition – Here will list the partition that is used for the cPanel account. Most commonly, this will be home.
- Quota – If you have set a disk size quota, it will appear under this column.
- Disk Used – This will read the current disk space that the cPanel account has used.
- Package – This is the package name that the cPanel account was created to use.
- Theme – This is the theme that has been set to be used by the cPanel account.
- Reseller / Owner – If a Reseller had created the cPanel account, this would show the cPanel username of the reseller. If the root is shown, this means the account was created from the root account in WHM.
- Suspended – If the cPanel account is currently suspended, this will display a timestamp of when the account had been suspended.
Extra Actions That Can Be Performed
In addition to the quick display of information the List Accounts page provides, a few quick actions can be done. To show the actions that can be performed on the cPanel account, click the + to the left of the domain column for the cPanel account.
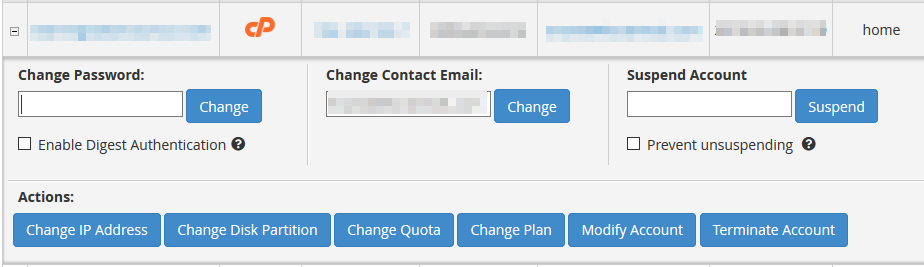
Change Password
This will allow you to change the password to whatever you would like for the cPanel account. Since this does not require entering the previous password or entering the new password twice, make sure that you are typing the new password correctly. Clicking Change will make the change effective.
Change Contact Email
Here you can change the contact email on the cPanel account. This can be used if you are not receiving the emails or want to have the emails sent to a different email account.
Suspend Account
The text box allows you to enter in a reason for the suspension visible when looking in WHM. The account will remain suspended until it has been unsuspended manually. If you select the Prevent unsuspending option, this will make it so that only Reseller accounts or those with the All privilege can unsuspend the account.
Change IP Address
This will redirect you to the Change Site's IP Address page within WHM, where you can change the IP address of the cPanel account to another that has been set up on the server.
Change Disk Partition
Selecting this action will take you to a page to select the new partition to have the cPanel account stored. If there are no available partitions for the cPanel account, the change will not be made.
Change Quota
With this action, you can change the disk size quota set for the cPanel account. This can be helpful if you want to limit users that you believe may be abusing the resources.
Change Plan
This will allow you to change the package that the cPanel account was created under. With the package will come any resource limitations that had been set and the accompanying feature list that is set for the package.
Modify Account
This will let you view all of the settings set for the cPanel account, similar to if it was newly created.
Terminate Account
Clicking this option will proceed through the process of Terminating the cPanel account off of the server. Before it proceeds to Terminate the account, it will ask for confirmation to prevent accidental deletion of the account.
Written by Hostwinds Team / April 22, 2019