
Hostwinds Tutorials
Search results for:
Table of Contents
Step 1: Add the following repository using nano
Step 2: Add the following to the file that you just created
Step 3: Save by using CTRL+X then Y then Enter
Step 4: Update the server via the following command
Step 5: Install FFMPEG
Step 6: Install MP4Box
Step 7: Install FLVTOOL2 by executing the following
Step 8: Verify That cPanel is Still Functioning Correctly by executing the following
Step 9: Install FLVTOOL++
Step 10: Install the PsuedoStreaming Apache Module by issuing the following commands in order
Step 11: Login to WHM
Step 12: Locate and click Apache Configuration
Step 13: Click Include Editor
Step 14: Under Pre-Main Include select All Versions
Step 15: Add the following to the end of the Editor.
Step 16: Click Update
Step 17: Restart Apache
Step 18: Search for restart in the WHM search bar
Step 19: Select HTTP Server (Apache)
Step 20: Click Yes
Step 21: Set the PHP Limits
Step 22: Search for PHP Configuration Editor in the WHM search bar
Step 23: Select PHP Configuration Editor
Step 24: Change upload_max_filesize to the maximum size video that you'd like to be uploaded.
Step 25: Click Save
How to Prepare the Server for ClipBucket
Tags: CentOS Web Panel
Step 1: Add the following repository using nano
Step 2: Add the following to the file that you just created
Step 3: Save by using CTRL+X then Y then Enter
Step 4: Update the server via the following command
Step 5: Install FFMPEG
Step 6: Install MP4Box
Step 7: Install FLVTOOL2 by executing the following
Step 8: Verify That cPanel is Still Functioning Correctly by executing the following
Step 9: Install FLVTOOL++
Step 10: Install the PsuedoStreaming Apache Module by issuing the following commands in order
Step 11: Login to WHM
Step 12: Locate and click Apache Configuration
Step 13: Click Include Editor
Step 14: Under Pre-Main Include select All Versions
Step 15: Add the following to the end of the Editor.
Step 16: Click Update
Step 17: Restart Apache
Step 18: Search for restart in the WHM search bar
Step 19: Select HTTP Server (Apache)
Step 20: Click Yes
Step 21: Set the PHP Limits
Step 22: Search for PHP Configuration Editor in the WHM search bar
Step 23: Select PHP Configuration Editor
Step 24: Change upload_max_filesize to the maximum size video that you'd like to be uploaded.
Step 25: Click Save
ClipBucket is an open-source script that allows you to host your own video-sharing website similar to Youtube. This article will cover how to configure your server to install ClipBucket in a CentOS environment with cPanel. If you'd like to install the ClipBucket software, please refer to our guide: How to install ClipBucket.
You'll need to be logged into your server via SSH before proceeding.
Step 1: Add the following repository using nano
nano /etc/yum.repos.d/linuxtech.repo
Step 2: Add the following to the file that you just created
[linuxtech]
name=LinuxTECH
baseurl=http://pkgrepo.linuxtech.net/el6/release/
enabled=1
gpgcheck=1
gpgkey=http://pkgrepo.linuxtech.net/el6/release/RPM-GPG-KEY-LinuxTECH.NET
Step 3: Save by using CTRL+X then Y then Enter
Step 4: Update the server via the following command
yum -y update
Step 5: Install FFMPEG
yum -y install ffmpeg
Step 6: Install MP4Box
yum -y install freetype-devel SDL-devel freeglut-devel
cd /usr/local/src/
wget http://repo.bstack.net/mp4box/gpac-0.4.5.tar.gz
wget http://repo.bstack.net/mp4box/gpac_extra_libs-0.4.5.tar.gz
tar -zxvf gpac-0.4.5.tar.gz
tar -zxvf gpac_extra_libs-0.4.5.tar.gz
cd gpac_extra_libs
cp -r * /usr/local/src/gpac/extra_lib
cd ../gpac
chmod 755 configure
./configure
make lib
make apps
make install lib
make install
cp bin/gcc/libgpac.so /usr/lib
install -m644 bin/gcc/libgpac.so /usr/local/lib/libgpac.so
chmod +x /usr/local/lib/libgpac.so
ldconfig
Step 7: Install FLVTOOL2 by executing the following
/scripts/installruby
gem install flvtool2
Step 8: Verify That cPanel is Still Functioning Correctly by executing the following
cd /
/scripts/upcp
Step 9: Install FLVTOOL++
cd
yum install wget boost-devel gcc gcc-c++ -y
rpm -ivh http://repo.bstack.net/scons/scons-1.3.1-1.noarch.rpm
mkdir flvtool++
cd flvtool++
wget http://repo.bstack.net/flvtool++/flvtool++-1.2.1.tar.gz
tar zxf flvtool++-1.2.1.tar.gz
scons
mv flvtool++ /usr/local/bin
Step 10: Install the PsuedoStreaming Apache Module by issuing the following commands in order
cd ~
wget http://h264.code-shop.com/download/apache_mod_h264_streaming-2.2.7.tar.gz
tar -zxvf apache_mod_h264_streaming-2.2.7.tar.gz
cd ~/mod_h264_streaming-2.2.7
./configure
make
sudo make install
Step 11: Login to WHM
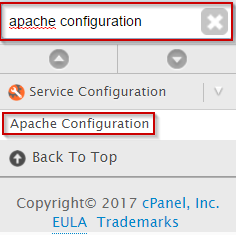
Step 12: Locate and click Apache Configuration
Step 13: Click Include Editor
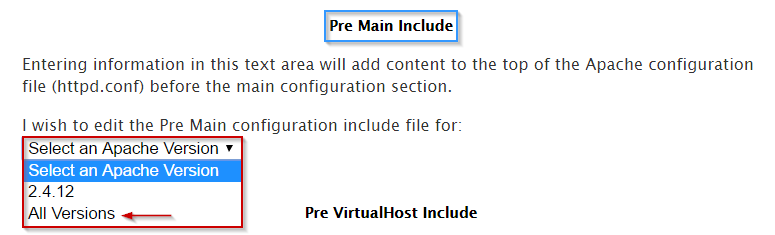
Step 14: Under Pre-Main Include select All Versions
Step 15: Add the following to the end of the Editor.
LoadModule h264_streaming_module /usr/local/apache/modules/mod_h264_streaming.so
AddHandler h264-streaming.extensions.flv
Step 16: Click Update
Step 17: Restart Apache
Step 18: Search for restart in the WHM search bar
Step 19: Select HTTP Server (Apache)

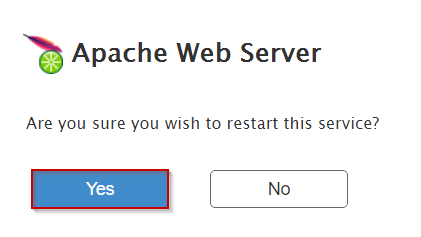
Step 20: Click Yes
Step 21: Set the PHP Limits
Step 22: Search for PHP Configuration Editor in the WHM search bar
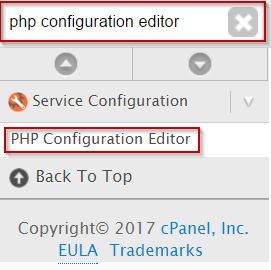
Step 23: Select PHP Configuration Editor
Step 24: Change upload_max_filesize to the maximum size video that you'd like to be uploaded.
Step 25: Click Save

Your Server is now Ready for Clipbucket PsudoStreaming!
Below are the paths for these Requirements:
/usr/bin/ffmpeg
/usr/local/bin/MP4Box
/usr/bin/flvtool2
/usr/local/bin/flvtool++
Written by Michael Brower / June 22, 2017