
Hostwinds Tutorials
Search results for:
Table of Contents
Set Up a Local Development Environment
Tags: FTP
Many website developers begin to learn how to create websites with coding tutorials from freeCodeCamp or Codecademy, which offer a built-in environment for you to learn website development skills. There are also sites like Codepen and CodeSandbox, which are useful for just learning to put together a website but has never set up a local development environment before. If you would like to deploy a website to your Hostwinds web hosting service, you can create your own local development environment and then upload your work from there to your web hosting account with Hostwinds.
There are a few necessary items that you will want to have to create your website on your local computer. This guide will list a generic set of tools for this purpose and help you get set up with an outline to build your site. Keep in mind that numerous alternatives and additions can be made to the list here, and the choice to build your site on your computer is entirely up to you.
The Tools You Will Need
The first tool you will want to have is a text editor such as Notepad++ or Atom, which is often more feature-packed than a standard text editor and is called an IDE (Integrated Development Environment). You will want to have an FTP program such as Mozilla's FileZilla Client for transferring your files to where they will be hosted. Finally, you will want to have a web hosting account with Hostwinds so that you can deploy your site once it is finished.
The Basic File Structure
To create a website, you will need a basic development environment with three files and three folders. The main folder will be the folder that contains your entire project and will also contain your index.html file and two other folders. The two folders inside the main project folder will hold your cascading style sheet file and your JavaScript file. This system allows you to link the files together through references in your code and to keep the files separated so that you can keep the technologies separated or split your JavaScript into separate files to keep the size manageable. Each type of file goes into the folder for its specific technology.
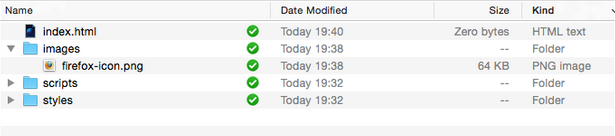
There are three main files on a basic website. The first is the HTML file for creating the markup, which represents the main content of your site. The next is the Cascading style sheet file (main.css in this guide) for styling the markup on your webpage. The final file is the JavaScript file (main.js in this guide) for creating action on your page. The HTML file will have links in it that will connect the other two files to it to connect these three files.
The link to your main.css file will be in the HTML link tag in the head of your HTML file:
The link to the JavaScript file will be in the HTML script tag at the end of the body of your HTML file:
Starter HTML Skeleton
Shown below is a starter template for an HTML file listed below. It has all of the necessary basic information already added to get you started. You will add your website content in between the body tags to create your website.
The index.html Page
Title of the document Content of the website......
Once you have created this file, you will want to save it as index.html to serve as your homepage.
Now you are ready to create your site or to paste in the work that you have created on an external coding site. Your website's code will be inserted between the first body tag and the script tag. You will enter your CSS code in the main.css file, and you will enter your JavaScript in the main.js file.
Deploying Your Site
Once you have finished creating and saving these three files, then you will be able to upload the files to your website's document root using an FTP client such as FileZilla or using File Manager in cPanel. For Hostwinds Shared Hosting, Business Hosting, and cPanel accounts, this will be the public_html folder to have your site come to life for you.
Summary
It is effortless to create your own custom website at Hostwinds by using HTML, CSS, and JavaScript and to have your site show up on the internet. Once you have set up the files and folders in this guide, you can customize your site with your own look and feel to make it your own.
Written by Hostwinds Team / December 6, 2018