
Hostwinds Tutorials
Search results for:
Table of Contents
Update Windows
Tags: Windows
This article describes how Hostwinds VPS and Cloud clients can obtain updates from Windows Update in Windows Server 2016, Windows Server 2012, and Windows Server 2008. This is highly suggested after any Windows Updates are released to keep your server as fast and secure as possible.
After the update, a reboot is required
Windows Server 2016
Step One: Open the Settings app
Step Two: Go to updates at the bottom
Step Three: Click check for updates
Step Four: Install the updates
Windows Server 2012 R2
Step One: Go to Search.
Step Two: In the search box, type Windows Update and tap or click Windows Update.
Step Three: In the details pane, click Check for updates, and then wait while Windows looks for the latest updates for your computer.
Step Four: If you see a message telling you that important or optional updates are available or telling you to review important or optional updates, click the message to view the updates to install.
Step Five: In the list, select the check box for the updates that you want to install under Important or Optional, and then tap or click Install.
Windows Server 2012
Step One: Click Search.
Step Two: Click Settings.
Step Three: In the search box, type Windows Update.
Step Four: Click Install optional updates.
Step Five: In the details pane, click Check for updates, and then wait while Windows looks for the latest updates for your computer.
Step Six: If you see a message telling you that important or optional updates are available or telling you to review important or optional updates, click the message to view the updates to install.
Step Seven: In the list, select the check box for the updates that you want to install under Important or Optional, and then tap or click Install.
Windows Server 2008 R2
Step One: Click Start, type update in the search box, in the list of results, click Windows Update.
Step Two: In the details pane, click Check for updates, and then wait while Windows looks for the latest updates for your computer.
Step Three: If you see a message telling you that important or optional updates are available or telling you to review important or optional updates, click the message to view the updates to install.
Step Four: In the list, select the check box for the updates that you want to install, click OK, and then click Install updates.
Windows Server 2008
Step One: Click Start, type update in the search box, in the list of results, click Windows Update.
Step Two: In the details pane, click Check for updates, and then wait while Windows looks for the latest updates for your computer.
Step Three: If you see a message telling you that important or optional updates are available or telling you to review important or optional updates, click the message to view the updates to install.
Step Four: In the list, select the check box for the updates that you want to install, click OK, and then click Install updates.
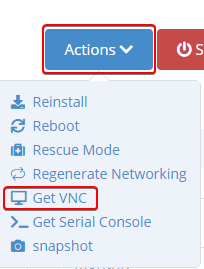
If you cannot access your server using RDP, please contact us requesting that we can run this update for you or update your server using Get VNC from your Client Area.
How To Access VNC/Console with Cloud server
Step One: Login to your account at https://clients.hostwinds.com
Step Two: Open your Cloud Portal
Step Three: Click on the instance Name
Step Four: Select Get VNC from the Actions button using the Drop Down Menu
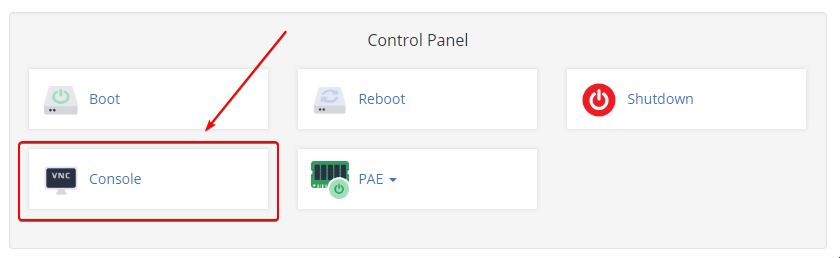
How To Access VNC with Legacy Windows Server
Step One: Login to your account at https://clients.hostwinds.com
Step Two: Click the Manage button next to your Legacy Service
Step Three: Use the Console link to Launch your VNC Console
Written by Hostwinds Team / May 10, 2018