
Hostwinds Tutorials
Search results for:
Table of Contents
WordPress Staging Area and Site Cloning
Tags: WordPress
With your WordPress installations, you now have access to additional functionality that enables you to create what is referred to as staging areas. After you install your WordPress site, you can now create a staging site. A staging site will allow you to create an identical copy of your Word Press website.
Create WordPress Staging Site
The following is a list of possible reasons for creating a staging area and cloning your site:
Testing platform: Make all your changes, explore how a new plugin or add-in will affect your site before merging it into the production site for the public to use. This is your sandbox, your testbed environment.
It is advisable to install a staging area into a subdomain for site development, i.e., dev.yoursite.com.
Troubleshoot Issues: Having issues with one of your WordPress sites? Use a staging area to troubleshoot and resolve programmatic and development issues. Sometimes plugins can interfere with your normal WordPress operations, and using a staging area to troubleshoot these issues will save you from a site's potential downtime.
New Sub Site: Clone to create new subdomain websites. Your company or institution can have different websites for each department, for example, orders.yoursite.com, billing.yoursite.com, shipping.yoursite.com.
Secure: Your staging area is not available to the public. All your changes, tinkering, and experimentation will never show on the public live site. You can view changes, test plugins, and functionality before they ever set foot into your live production site.
Predefined Site Template: The use of a cloning option allows you to build a pre-defined Word Press installation that suits your needs. Perhaps your providing websites to clients in a specific industry or field. Having a site ready to push to an addon domain will decrease the time to deliver a beginning product to your clients.
How To Create A WordPress Staging area
We will cover a quick and easy method of creating the staging area in the rest of this guide.
As a best practice before beginning any staging or cloning, it is advisable to backup your entire site.
Using the Softaculous Installer from cPanel
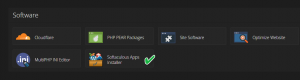
Step One: Go into cPanel and choose Softaculous Apps Installer
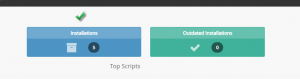
Step Two: Select Installations at the top of the page
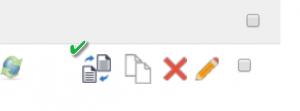
Step Three: Find your desired WordPress installation and click the double paper icon.
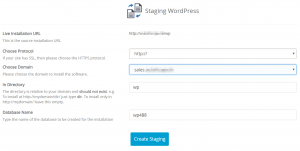
Step Four: In the staging window, fill in the appropriate fields, then click the create staging button.
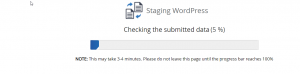
Step Five: WordPress is now creating the staging area
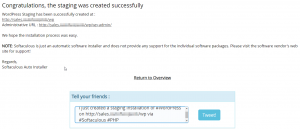
Step Six: Now that the staging area installation is complete,e note the provided links to access. Click the return to overview link.
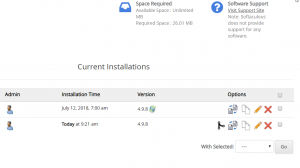
Step Seven: As you can see, we now have an additional installation listed. Make a note of the staging installation area icon when desired. You click this button to push the site installation into your live environment, along with all of your changes and updates.
Step Eight: You can accept the default settings or customize the installation, such as setting the site to live, which means your website visitors will be able to see it
Written by Hostwinds Team / November 16, 2018