
Hostwinds Tutorials
Search results for:
Table of Contents
How to Create A Duplicate cPanel Account (3 Steps)
Tags: cPanel
How to Create A Duplicate cPanel Account
If you find the need to create a new cPanel account with the same or similar settings as a current account on your server, this can be done in a few simple steps on your Hostwinds Cloud VPS or Dedicated Server.
- Use the pkgacct script to create a cpmove archive for an account. This will create a file in .tar.gz format.
- After creating the cpmove file, you may modify the original account
- Then restore the archive or transfer it between servers if you need to create the account on another server.
The first step in this process will involve accessing your server as the root user. You may find our guide on this topic helpful as you get started: Connecting To Your Server Via SSH.
1. Making a full backup of the original cPanel account.
Log in as root to your Hostwinds server via SSH or Get VNC in the Cloud Portal. Back up the original cPanel account by running the command below, using the specific cPanel username in place of "username. "
/scripts/pkgacct [arguments] username [destination]
The pkgacct script will create a cpmove archive for the account. The archive will be stored in /home/cpmove-username.tar.gz, with the username replaced by your specific cPanel username with no destination specified.
cPanel's documentation about the pkgacct script details arguments that the pkgacct script accepts. A cpmove archive must only be stored in the following directories or left with no destination specified. This is because the restorepkg script used to restore the account only searches in these directories:
- /home
- /usr/home
- /web
- /home2
- /home3
- /root
- /us
2. Modify the original cPanel account.
Next, the domain, username, and any needed settings on the original cPanel account should be modified. Our guide can help locate the "Modify an Account" section in WHM.
3. Restore the cpmove Archive.
WHM Method:
Now that the original cPanel account's username, domain, and other optional settings have been modified, you may restore the cpmove archive on the same server or after transferring the .tar.gz file to another.
You may restore the cpmove archive from the command line or WHM. From WHM, you can locate the "Restore a Full Backup/cpmove File" section in:
WHM >> Home >> Backup >> Restore a Full Backup/cpmove File
Once here, you may restore by using the cPanel username or the cpmove archive filename.
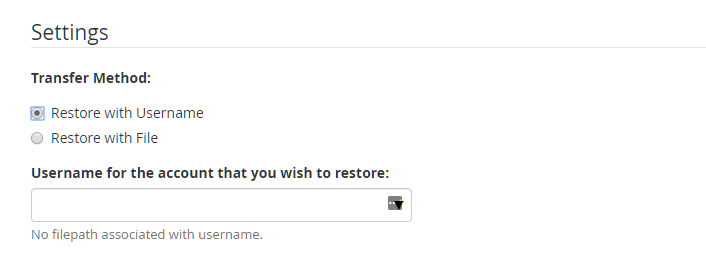
The filename of the cpmove archive must be in one of the following formats.
- cpmove-{USER}
- cpmove-{USER}.tar
- cpmove-{USER}.tar. gz
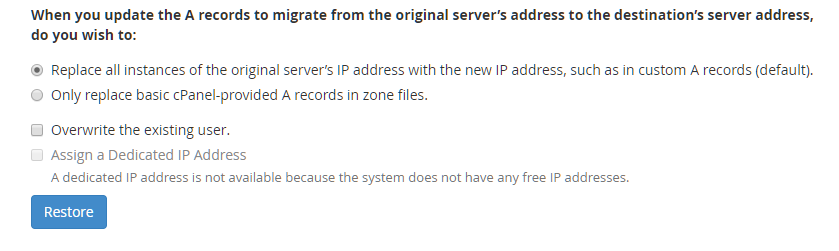
Following this step, you may choose to replace all instances of the original IP or only replace basic cPanel-provided A records in zone files.
Then you may choose to overwrite an existing cPanel account with the username being restored.
Finally, a dedicated IP can be assigned to the cPanel account if the server has available IP addresses. Lastly, click "Restore."
CLI Method:
As an alternative to WHM, you may perform this restore from the command line as the root user, using the restorepkg script.
/scripts/restorepkg [arguments] [input] [filename]
Example of using the next available IP from the pool when restoring the account for user "user1":
/scripts/restorepkg --ip=y cpmove-user1
Unlike in WHM, only the filename can restore the cpmove archive and not the username. Once again, the filename of the cpmove archive must be in one of the following formats.
- cpmove-{USER}
- cpmove-{USER}.tar
- cpmove-{USER}.tar. gz
You may use arguments like '–ip' with input to restore the cpmove archive with the next available IP address in the pool, the shared IP address, or a known IP address on the server. The '–disable' argument may also be useful when restoring an account. Find more on the restorepkg script here.
Written by Benjamin Bream / October 17, 2019