
Hostwinds Tutorials
Search results for:
Table of Contents
How To Set Up DNS Using Bind On Your Server
Tags: Nameservers, DNS, Bind
In this guide, you will learn how to set up an internal DNS using Apache and bind. This will allow you to configure private Nameservers and connect your domain to your server without using a control panel. You will need to connect to your server via SSH or another method such as VNC. For more information on how to connect to your server via SSH, please review Connecting To Your Server Via SSH.
To run bind and continue with this guide, you will need to have the LAMP stack installed on your Hostwinds Server.
Configuring Your DNS
Step 1. You will need to install the Bind9 packages. You can do this by running.
apt-get install -y bind9 bind9utils bind9-doc dnsutils
Step 2. Once these are installed, you will need to edit you're named. conf.options file, you can do this by running nano or your favorite text editor.
nano /etc/bind/named.conf.options
You will need to add your IP addresses as "Forwarders" if you have two IPv4 addresses, you can use those, or you can use your main ipv4 and your ipv6. You will also need to add listen-on { localhost; 104.XXX.XXX.XX; }; using your main IP. You can see an example of this below.
options {
directory "/var/cache/bind";
// If there is a firewall between you and nameservers you want
// to talk to, you may need to fix the firewall to allow multiple
// ports to talk. See http://www.kb.cert.org/vuls/id/800113
// If your ISP provided one or more IP addresses for stable
// nameservers, you probably want to use them as forwarders.
// Uncomment the following block and insert the addresses replacing
// the all-0's placeholder.
listen-on { localhost; 104.XXX.XXX.XX; };
forwarders {
104.XXX.XXX.XX;
2607:XXXX:XXXX:XXX::X;
};
//========================================================================
// If BIND logs error messages about the root key being expired,
// you will need to update your keys. See https://www.isc.org/bind-keys
//========================================================================
dnssec-validation auto;
auth-nxdomain no; # conform to RFC1035
listen-on-v6 { any; };
};
Step 3. You will need to add DNS zones in your named.conf.default-zones using your text editor:
nano /etc/bind/named.conf.default-zones
You will need to add two zones. The first would be for your domain, example.com. The second would be for your reverse DNS, 104.XXX.XX.in-addr.ARPA
zone "example.com" {
type master;
file "/etc/bind/db.example.com";
allow-update { none; };
};
zone "104.XXX.XXX.in-addr.arpa" {
type master;
file "/etc/bind/db.104";
allow-update { none; };
};
Step 4. You will need to create the actual zone files you just called, so let's use nano to edit this db.example.com file
nano /etc/bind/db.example.com
This file should look like this, replacing example.com with your desired domain and the IP address with the one supplied by your server
$TTL 604800
@ IN SOA ns.example.com. root.example.com. (
2; Serial
604800; Refresh
86400; Retry
2419200; Expire
604800 ); Negative Cache TTL
;
@ IN NS ns1.example.com.
ns1 IN A 104.XXX.XXX.XX
@ IN NS ns2.example.com.
ns2 IN AAAA 2607:XXXX:XXXX:XXX::X
@ IN A 104.XXX.XXX.XX
www IN CNAME example.com
You will also have to create a zone file for your reverse DNS the same way you made the db.example.com above. However, the file should look like this
$TTL 604800
@ IN SOA ns1.example.com. root.example.com. (
2; Serial
604800; Refresh
86400; Retry
2419200; Expire
604800 ); Negative Cache TTL
;
@ IN NS ns1.example.com.
5 IN PTR ns1.example.com.
@ IN NS ns2.example.com.
10 IN PTR ns2.example.com.
Every time you update these files, you will have to increase the Serial number. It would be best if you also were sure to replace example.com with the actual domain name.
Step 5. You can check your configuration and zones by running these commands
named-check conf
named-checkzone example.com db.example.com
named-checkzone 104.XXX.XXX.in-addr.ARPA /etc/bind/db.104
If the configuration is good, name-check conf will return nothing.
If the zone is good, the named-check zone will return output similar to the following:
zone example.com/IN: loaded serial 10
OK
Step 6. Once all of the configurations and zones check out, you will need to Restart and enable bind9
systemctl restart bind9
systemctl enable bind9
Step 7. Finally, you will need to tell the server to check the name. conf. You can do this by editing your /etc/default/bind9 file to check the name. conf
nano /etc/default/bind9
The file should look similar to this:
OPTIONS="-u bind -c /etc/bind/named.conf"
Step 8. Check bind9 status for any additional errors
systemctl status bind9.service
If should look like this:
bind8.service - Berkeley Internet Name Domain (DNS)
Loaded: loaded (/usr/lib/systemd/system/bind9.service; enabled; vendor preset: disabled)
Active: active (running) since Thu 2018-11-15 21:57:23 UTC; 18h ago
Main PID: 23785 (named)
CGroup: /systemd/bind9.service
└─23785 /etc/default/bind9 -u bind -c /etc/bind/named.conf
Nov 15 21:57:23 xxxxxxxxxxxx.hostwindsdns.com bind[23785]: command channel listening o...3
Nov 15 21:57:23 xxxxxxxxxxxx.hostwindsdns.com systemd[1]: Started Berkeley Internet Nam....
Nov 15 21:57:23 xxxxxxxxxxxx.hostwindsdns.com bind[23785]: command channel listening o...3
Nov 15 21:57:23 xxxxxxxxxxxx.hostwindsdns.com bind[23785]: managed-keys-zone: loaded s...1
Nov 15 21:57:23 xxxxxxxxxxxx.hostwindsdns.com bind[23785]: zone example.com/IN: lo...0
Nov 15 21:57:23 xxxxxxxxxxxx.hostwindsdns.com bind[23785]: zone 104.xxx.xxx.in-addr.ar...0
Nov 15 21:57:23 xxxxxxxxxxxx.hostwindsdns.com bind[23785]: all zones loaded
Nov 15 21:57:23 xxxxxxxxxxxx.hostwindsdns.com bind[23785]: running
Nov 15 21:57:23 xxxxxxxxxxxx.hostwindsdns.com bind[23785]: zone example.com/IN: se...)
Nov 15 21:57:23 xxxxxxxxxxxx.hostwindsdns.com bind[23785]: zone 104.xxx.xxx.in-addr.ar...)
Setting up Glue Records
To complete making your nameservers, you will need to go to your domain registrar and set up 'glue records' on your nameservers. This is where you connect the nameserver records to the IP of the nameservers. Here is an example of a domain registered at Hostwinds to help you set this up by following the example in this guide.
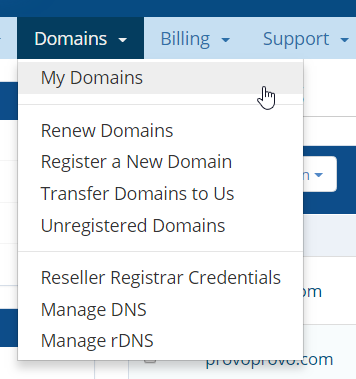
Step 1. In your Client Area, Select the Domains dropdown and select My Domains from the drop-down
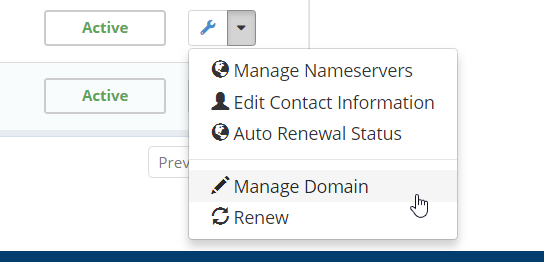
Step 2. Select the drop-down next to the wrench icon and choose to Manage Domains.
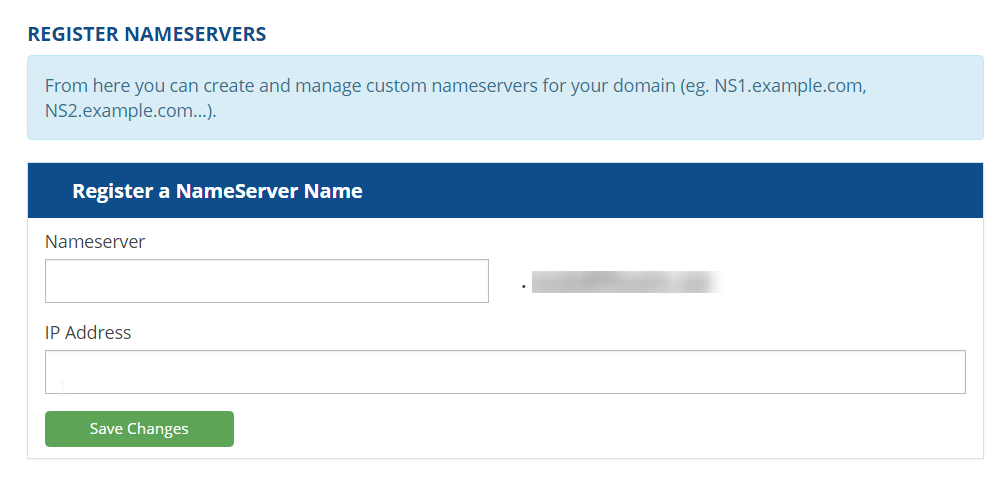
Step 3. On the left side in the Manage box, choose _Private Nameserver_'

Step 4. Here is where you input the ns1.example.com and ns2.example.com and their associated IP's
Testing Your Domain
Once all of the above steps are complete, you should be ready to go! To test your domain, you can use websites like whatsmydns.com or the dig command using SSH.
dig example.com ns
The output of this command should look like this:
; <<>> DiG 9.9.4-RedHat-9.9.4-61.el7_5.1 <<>> example.com ns
;; global options: +cmd
;; Got answer:
;; ->>HEADER<<- opcode: QUERY, status: NOERROR, id: 45516
;; flags: qr rd ra; QUERY: 1, ANSWER: 2, AUTHORITY: 0, ADDITIONAL: 1
;; OPT PSEUDOSECTION:
; EDNS: version: 0, flags:; udp: 4096
;; QUESTION SECTION:
;example.com. IN NS
;; ANSWER SECTION:
example.com. 86400 IN NS ns1.example.com.
example.com. 86400 IN NS ns2.examplecom.
;; Query time: 2 msec
;; SERVER: 104.xxx.xxx.xx#53(104.xxx.xxx.xx)
;; MSG SIZE rcvd: 80
Adding Another Domain
To add another domain, you would need to add another zone file.
Here is an example of what that zone file would look like for our additional db.domain.com zone file
$TTL 604800
@ IN SOA ns.example.com. root.example.com. (
2; Serial
604800; Refresh
86400; Retry
2419200; Expire
604800 ); Negative Cache TTL
;
@ IN NS ns1.example.com.
ns1 IN A 104.XXX.XXX.XX
@ IN NS ns2.example.com.
ns2 IN AAAA 2607:XXXX:XXXX:XXX::X
@ IN A 104.XXX.XXX.XX
www IN CNAME domain.com
Written by Hostwinds Team / November 17, 2018