
Hostwinds Tutorials
Search results for:
Table of Contents
Setting Up DNS for iRedMail (CentOS 7)
Tags: Email, DNS, CentOS Web Panel
This guide will cover creating A, MX, SPF, DKIM, DMARC, and rDNS records for your iRedMail server. iRedMail will add a DKIM key to your server during installation, and this can easily be retrieved to create the DNS record. The examples below will demonstrate how to add these records in Hostwinds' Cloud DNS Manager.
Prerequisites:
If you have not installed iRedMail, please install iRedMail on your CentOS 7 server.
Step 1: A Record
Your fully qualified domain name, or the hostname of your iRedMail server, should be pointed to your server. Do this by creating an A record for the hostname.
The record can be similar to mx or mail, pointed to your server's IP address:
Step 2: MX Record
Next, point your domain to the A record that was created. The value entered should be in the format priority fully-qualified-domain-name, where priority is a number, typically 0 for the first MX record. Your priority may increase for other MX records in increments of 5 or 10 if you have backup mail servers (a higher number means lower priority).
The fully-qualified-domain-name should be the A record created in Step 1 of this article (0 mail.yourdomain.com):
Step 3: SPF Record
The SPF record authenticates any IP's that your domain will send mail from. Thus, the MX record or the IP address can be used to identify where mail for the domain should come from. Finally, the SPF record defines what should happen to mail that does not match the MX record or IP address listed earlier in the record. This is called a hard fail (-all) or soft fail (~all). Hard fail means that any mail that does not match your listed MX record or IP address will be rejected. Soft fail means that mail can be received if it does not match the listed MX record or IP, but it may be marked as spam.
Add the SPF record (v=spf1 mx ip4:YOUR-IP-ADDRESS -all). You may want to start with a soft fail and later move to a hard fail:
Step 4: DKIM Record
iRedMail adds a DKIM key to your server during the installation. DKIM is crucial to authenticating the mail you send.
Retrieve the DKIM key on your iRedMail server using:
amavisd -c /etc/amavisd/amavisd.conf showkeys
The output will be similar to:
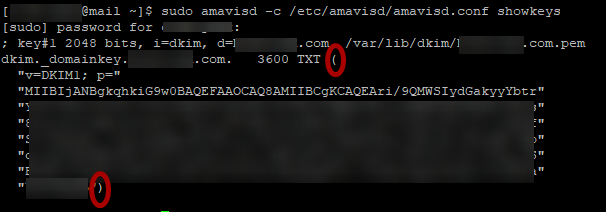
Copy the text inside the parentheses ( ). It will be used to make your DKIM record. Next, paste the text into a text editor and remove all quotation marks ("") from the text inside the parentheses.
Create a new TXT record for dkim._domainkey. Then paste the text without quotation marks. The format will be v=DKIM1; p=your-key:
Step 5: DMARC Record
DMARC has more customization options than the previous records in this article. When first testing mail with this domain, you may want a simple DMARC record similar to:
v=DMARC1; p=none; rua=mailto:dmarc@yourdomain.com
The email address above (dmarc@yourdomain.com) should be created, or you can use a different email address to receive reports about this domain.
In the next example, notice that p=reject, instead of none. Do this when you are confident the SPF and DKIM records are correctly published.
v=DMARC1; adkim=s; aspf=s; p=reject; sp=none; rua=mailto:dmarc@yourdomain.com; ruf=mailto:dmarc@yourdomain.com
You can learn more about which options might be best for your DMARC record here. When you are ready to add your record, create a new TXT record for _dmarc.
Step 6: rDNS
To set rDNS for your Hostwinds VPS, you can navigate the Client Area to Domains > Manage rDNS.
Here, you can edit rDNS for each IP on your VPS:
Set rDNS to the hostname of your iRedMail server and click Update:
Conclusion:
Now you should have all the necessary DNS records to begin sending mail. However, DMARC may need further adjusting. You can now navigate to the iRedMail admin panel at https://your-fully-qualified-domain-name/iredadmin/ and manage your mail server.
Written by Hostwinds Team / June 5, 2021