
Hosting Tutorials
Search results for:
Table of Contents
Advanced Zone Editor
Tags: cPanel
Important: cPanel deprecated this interface in cPanel & WHM version 62. We strongly recommend that you use cPanel's Zone Editor interface (Home >> Domains >> Zone Editor)
DNS (Domain Name Service) is how the Internet converts human-readable domain names (example.com) into computer-readable IP addresses (for example, 192.0.32.10). DNS uses zone files that reside on your server to map domain names to IP addresses. The DNS is also used to tell various services what should be done with your domain name, such as what server to send mail to for that domain and where the website is actually located.
There are several different types of records in a domain's zone file. This feature allows you to create, edit, and delete A (Address Record), AAAA (IPv6 Address Record), CNAME (Canonical Name Record), SRV (Service Record), and TXT (Text Record) records.
Finding the Advanced DNS Editor in cPanel
You will want to start by Logging into your cPanel dashboard
Once there, you'll see several categories on the right-hand panel of the screen. Scroll down to the Domains category and find the Advanced DNS Editor icon. Click that to enter the editor.
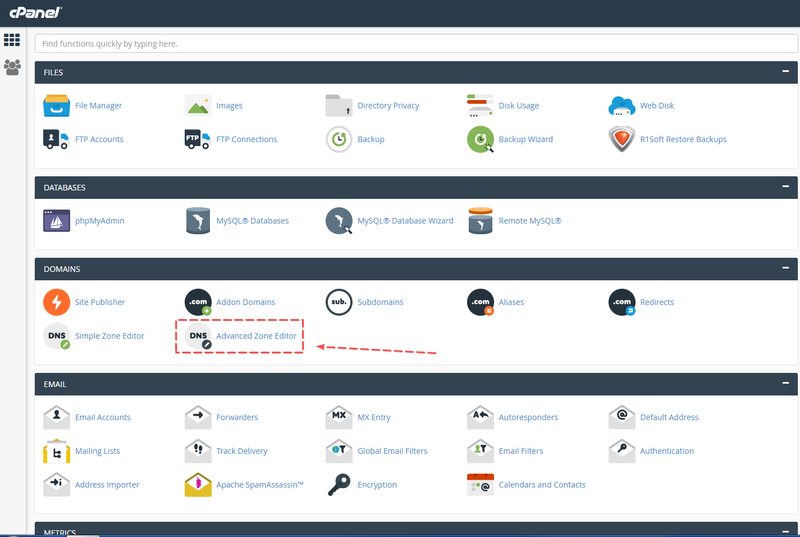
Select the domain you will be working with from the Select A Domain dropdown menu.
Add an A Record
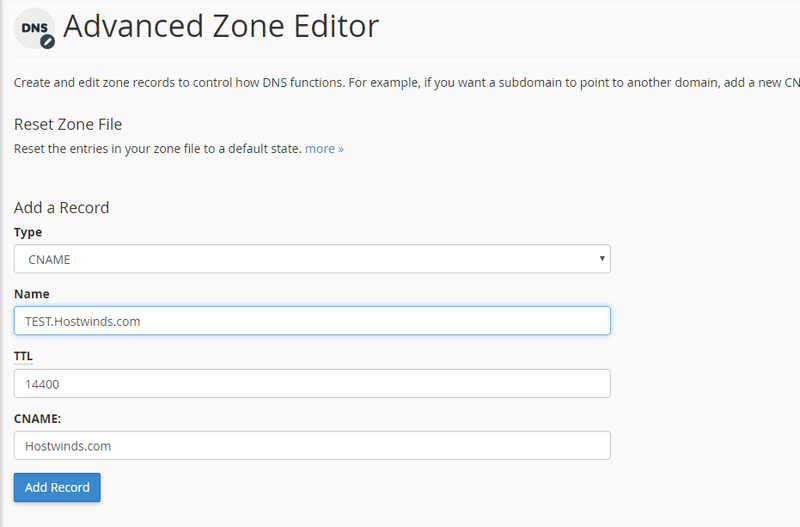
Go to the Add A Record section and fill out the fields for your desired record.
Type: Choose from the dropdown. There are A records, CNAME records, and TXT records.
Name: Name your record - be sure that it ends with your domain name and a period. Ex: record.hostwinds.com.
TTL(Time To Live): The record will exist on DNS servers around the world for this fixed amount of time. This is set in seconds - 14400 is 4 hours, which is a good standard (Setting the TTL too low can harm the server). After the time expires, the server will be contacted.
CNAME: Include the address that the record refers to. It can be set as an IP address, a domain name, or a subdomain. TXT records will be set as text set within quotes.
Record Types Explained
A – This record maps hostnames to IP addresses. Records are a necessary component as they allow DNS servers to locate your website and its various services on the Internet. Without appropriate A records, your visitors cannot access your website, FTP site, or email accounts.
cPanel configures your DNS records so that visitors can resolve your website and its services, such as FTP and email. Only add A records when you add a service that cPanel & WHM or your service provider does not provide.
AAAA – This record maps hostnames to IPv6 addresses.
CNAME – This record creates an alias for another domain name, which DNS looks up. This is useful, for example, if you point multiple CNAME records to a single A record to simplify DNS maintenance.
Note: You can't point a CNAME record to an IP address. That's what A records are used for
SRV – This record provides information about available services on specific ports on your server.
Note: The SRV record must point at a hostname with an A (or AAAA) record. You cannot point an SRV record at a CNAME record.
TXT – This record contains text information for various services to read. For example, TXT records can specify the SPF (Sender Policy Framework) or DKIM (Domain Keys Mail Identifier) email authentication systems.
Note: On servers that run CentOS 7, you may see a named warning about the absence of SPF resource records on DNS. This would not be relevant, as CentOS 7 Servers would use TXT records instead of SPF records.
Once you've entered all information for your record, click on the Add Record button just under the data entry fields.
Congratulations! You've just created a DNS record with the Advanced DNS Editor. If necessary, you may edit existing records. Find the record in the list at the bottom of the screen. The left-hand side of each row has a Delete and Edit link for the respective record.
Reset Zone Files
Warning: This feature erases any modifications that you made to your zone records, either with this feature or with cPanel's Simple Zone Editor interface (Home >> Domains >> Simple Zone Editor). The system attempts to save the domain's TXT entries. We recommend that you write down any changes that you wish to save before you use this feature.
To reset your DNS zone files to the defaults that are set through the WHM for your server, perform the following steps:
If this account owns more than one domain, select the domain that you wish to manage from the Domain menu.
Click More.
Select the "Are you sure that you wish to erase all of your entries and revert to the default state?" checkbox. This is an extra confirmation of the changes that will be made.
Click Reset Zone File.
Edit a record
To edit a record, perform the following steps:
- If this account has more than one domain, select the domain that you wish to manage from the Domain menu.
- Click Edit next to the record that you wish to edit.
- Change the information in the text boxes as necessary.
- Click Edit Record to save your changes, or click Cancel to discard them.
Delete a record
To delete a record, perform the following steps:
- If there is more than one domain on the cPanel account, select the domain that you wish to manage from the Domain menu.
- Click Delete next to the record that you wish to remove.
- Click Delete.
If you should have any questions or would like assistance, please contact us through Live Chat or by submitting a ticket with our Technical Support team.
Written by Michael Brower / August 15, 2017