
Hosting Tutorials
Search results for:
Table of Contents
Getting Started With CentOS 7
Tags: CentOS Web Panel
This article is intended for Hostwinds clients who have chosen to install CentOS 7 to begin configuring and customizing the server using the command-line interface. We highly recommend taking a snapshot backup before making any modifications in case you need to restore it at any time. Below are some basic configurations you can view and configure to fit your needs. This article is meant to offer our Unmanaged clients some basic commands and information to help you get started with a clean install of CentOS 7 on your Instance.
Any commands that are preceded with a # are suggested to be using root user access. Commands preceded with a $ indicate that a regular user can perform these tasks.
Basic System Configuration
Date and Time
Displaying Current Date and Time using one of the following commands
date
timedatectl
Changing Local Time
timedatectl list-timezones
timedatectl set-timezone [time_zone]
Change [time_zone] to the time zone you prefer to use for your local time from an option on the list-timezones results
System Locale
List all available locales
localectl list-locales
Show current locale setting
localectl status
Set or change system locale
localectl set-locale LANG=[locale]
Replace [locale] above with the locale setting of your choice
Manage Software using Yum
List all enabled repositories
yum repolist
Search for a package using yum
yum search [string]
Replace [string] above with what you are searching for
Install a package
yum install [package_name]
Replace [package_name] above with the package name
Update all packages and their dependencies
yum update
Enable service on boot
systemctl enable [service]
Disable a service on boot
systemctl disable [service]
Replace [service] with the name of the service.
Install ConfigServer Security & Firewall (CSF) or Firewalld
Install CSF
If you decide to use CSF instead of firewalld, here are the installation instructions:
cd /usr/src
rm -fv csf.tgz
wget https://download.configserver.com/csf.tgz
tar -xzf csf.tgz
cd csf
sh install.sh
Enable csf and lfd using your favorite text editor to be started and taken out of testing. Just open the /etc/csf/csf.conf file and replace TESTING = "1" with TESTING = "0" and save this file.
Next, start csf:
systemctl start csf
systemctl start lfd
Now, enable csf and lfd to begin on startup:
systemctl enable csf
systemctl enable lfd
You can then configure csf and lfd by reading the documentation and configuration files in /etc/csf/csf.conf and /etc/csf/readme.txt directly or through the csf User Interface.
Install Firewalld
If you prefer to use firewalld with SELinux and not csf, the instructions are below:
yum install firewalld
Start Firewalld and begin on system startup
systemctl enable firewalld
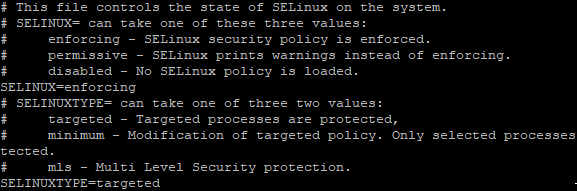
Enable SELinux
Set SELinux to enforce permanently so that SELinux policies are enforced, modify the /etc/selinux/config configuration file using your favorite text editor, and set this to enforce as seen below and save these changes.
Generate SSH Keys
If you have not already generated a key when creating your instance, or if you would like to add another key pair, you can do so with the help of the guide to Create a Strong SSH Key in Linux
Manage User Accounts
Create a new user
# useradd [options] [user_name]
Use useradd –help to see the options to replace in [options] above and replace [user_name] with the username you would like to create.
Assign a password to a user
# passwd [user_name]
Replace [user_name] above with the username.
Add a User to a Group
# usermod -a -G [group_name] [user_name]
Replace [group_name] with the group name you want to assign the user to and the [user_name] with the desired user name you would like to assign to a group.
If you are having any trouble with our Managed Services or have any questions, please let us know to help you.
Written by Hostwinds Team / April 12, 2018