
Hosting Tutorials
Search results for:
Table of Contents
How to Manually Migrate Accounts from Another Non cPanel Environment
Tags: cPanel
How do I move my non-cPanel site to cPanel?
Follow the steps below to move your non-cPanel site to cPanel. If you're on a Cloud or Dedicated server and have access to editing DNS, follow the DNS steps through the How to transfer/migrate a server with no downtime of any kind (or database lag) guide.
Step 1. Backup everything on your site(s)/server, found in your control/admin area (exactly where or how will vary depending on your host and the control area used)
Step 2. Download all files and directories, maintaining the same structure
Step 3. Backup all databases associated with your site (If you're using WordPress and aren't sure you can find the database name in the wp-config file)
Step 4. Once it's done backing up, download it
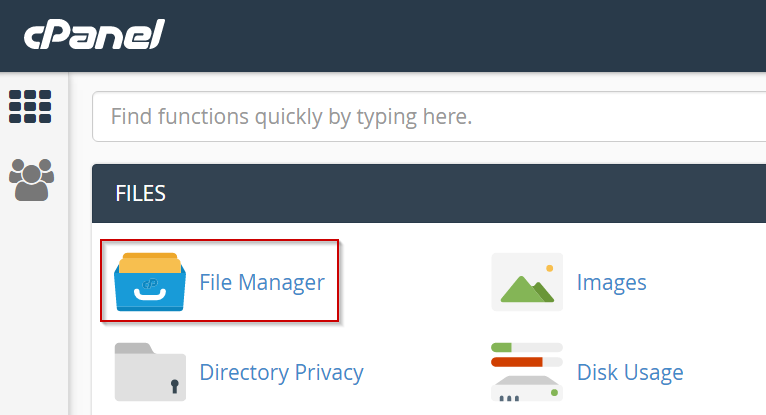
Step 5. Log in to the cPanel account that you're moving to and go to cPanel's File Manager or connect via FTP
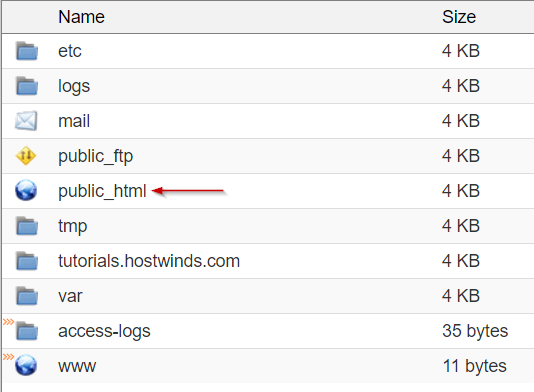
Step 6. Upload your directories and files to the public_html folder
Step 7. Go to MySQL Database Wizard to create your new database and user.

Step 8. Follow the on-screen prompts to create a new database
Step 9. Keep your username and password handy, as you'll need them again
Step 10. Assign the user to the database and assign All Privileges
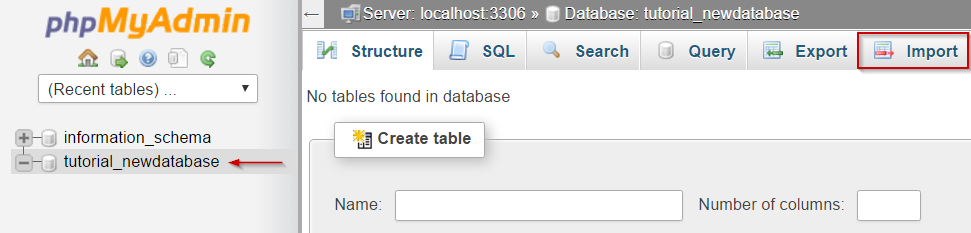
Step 11. Go to PHPMyAdmin

Step 12. Go to the database you just created
Step 13. Click Import
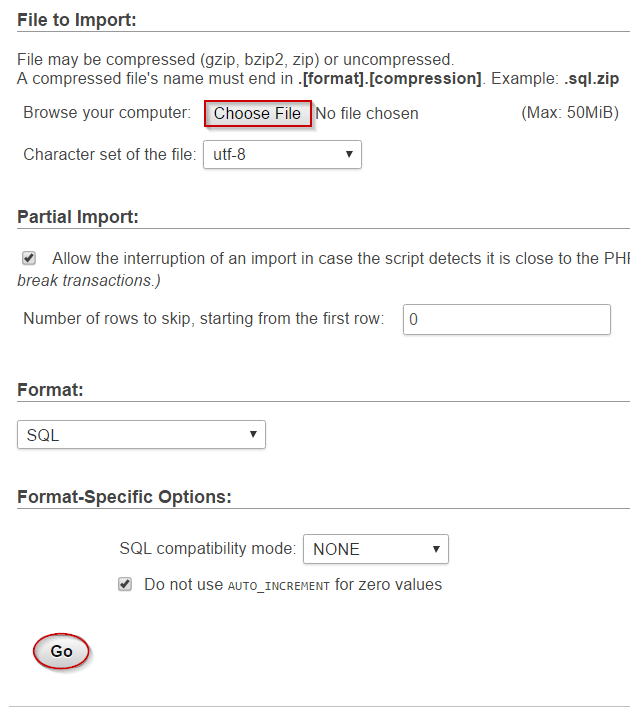
Step 14. Click on Choose File and browse to the database file you downloaded earlier.
Step 15. Click Go
Step 16. You should get a message that the database data has successfully been imported.
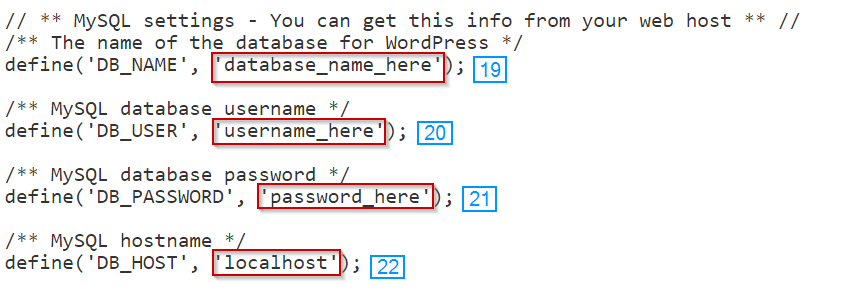
Step 17. Go to your wp-config file or other database config file in the public_html directory of the File Manager.
Step 18. Right-click the file and select the edit option.
Step 19. Edit db_name with the database name you created in MySQL Database Wizard
Step 20. Edit db_user with the username you assigned to it
Step 21. Edit db_password with the password you assigned to it
Step 22. Edit db_host with localhost
Step 23. Make sure your site is working on the new server by visiting the IP/CPANEL_USERNAME. This is called the Temporary URL and can be very useful. However, some page styling may not display correctly or may show a 404 page. An example of the Temporary URL would be 1.2.3.4/tutorials
- The domain name is still using old nameservers, so looking at yourdomain.com will show the correct content no matter if you've installed it correctly or not.
- Alternatively, instead of using the Temporary URL. you can change your hosts file, which is recommended as it will display everything as it is – this is explained below the notes
Step 24. If your site is working correctly, change nameservers with your domain registrar to the domain nameservers we provided you (or whatever host you're moving to provide you)
Step 25. Wait 48 hours before canceling your old hosting, and before doing so, ensure that the site is loading correctly from your new hosting.
Note: We provide free migration if you're moving your site to Hostwinds and don't want to attempt this yourself. Just get in touch with us to get it started.
Note: PHPMyAdmin has a size restriction. If you get a message that your .sql file is too large, you'll need to import it using a MySQL client such as HeidiSQL or Navicat. If you're on our Shared or Business hosting and receive this message, please contact us about importing your database.
Note: Some sites, including those on WordPress, will still show the site on the old host even if you try to view it by visiting the IP. The best way to make sure you're viewing it on your new host is to edit your computer's host file. (Explained Below)
Note: It can take 24-48 hours for your site to fully change nameservers, which is why you want to wait 48 hours before canceling your old hosting. Otherwise, you risk your site not being available.
How do I edit my host's file to view my site?
You can find and edit your host's file by following this guide.
Windows
C:WindowsSystem32driversetc:
Open the host file in Notepad, Run it as administrator.
Add these lines, replacing IP_address with your server's IP:
IP_address yourdomainname.com
IP_address www.yourdomainname.com
Mac
- Go to Applications
- Go to Utilities
- Go to Terminal
- Open Terminal. app
sudo nano /private/etc/hosts
- Enter your username and password
Edit the host's file to add these lines, replacing IP_address with your server's IP:
IP_address yourdomainname.com
IP_address www.yourdomainname.com
Now save and close the file, flush your DNS cache and view your site by IP.
If you want to change the host's file settings you just made, delete the lines you added or add # at the start of each line (this will comment that out, so the lines aren't used anymore).
Written by Michael Brower / December 13, 2016